从Application跳转到Bootloader中,可以采用按键(Button)触发,也可以直接用BLE命令,因此后者称为Buttonless。本文介绍Buttonless DFU服务的技术细节和使用方法。
(1)DFU服务
Buttonless DFU是一个自定义服务,它下面仅包含一个特征:
| Attribute | UUID | Property |
|---|---|---|
| Secure DFU Service | 0xFE59 | – |
| Buttonless DFU Characteristic | 0x8EC90003-F315-4F60-9FB8-838830DAEA50 | Write, Indicate |
Buttonless DFU特征主要职责是:从Application进入DFU Mode。
DFU Mode指芯片停驻在Bootloader中,准备或正在执行DFU相关动作。
执行这个过程,DFU Controller发送一个Enter DFU Mode的命令,该命令需要返回Response,然后从Application跳转进入Bootloader,进入DFU Mode。

在代码层面,Enter DFU Mode命令向GPREGRET寄存器写入一个标志位,然后重启。Bootloader启动时会检查该标志位。具体代码为:
uint32_t ble_dfu_buttonless_bootloader_start_finalize(void)
{
    err_code = sd_power_gpregret_clr(0, 0xffffffff);
    err_code = sd_power_gpregret_set(0, BOOTLOADER_DFU_START);
    ...
    NVIC_SystemReset();
}
(2)添加DFU服务
SDK 15提供了一个Buttonless的模板工程:ble_app_buttonless_dfu。用户可以基于该模板,开发自己的应用。
为了理解Buttonless服务,这里向ble_app_hrs工程手动添加Buttonless DFU服务。
打开<sdk>\examples\ble_peripheral\ble_app_hrs工程,确保该工程能够正常运行。
添加源文件
在工程中增加一个文件夹nRF_DFU,并添加以下文件:
- <sdk>\components\ble\ble_services\ble_dfu\ble_dfu.c
- <sdk>\components\ble\ble_services\ble_dfu\ble_dfu_bonded.c
- <sdk>\components\ble\ble_services\ble_dfu\ble_dfu_unbonded.c
- <sdk>\components\libraries\bootloader\dfu\nrf_dfu_svci.c
添加Include目录
在工程配置窗口中找到User Include Directories,添加以下路径:
- ../../../../../../components/libraries/bootloader
- ../../../../../../components/libraries/bootloader/ble_dfu
- ../../../../../../components/libraries/bootloader/dfu
- ../../../../../../components/libraries/svc
如果使用SEGGER Embedded Studio,需要额外注意这些路径末尾的空格,可能导致不被正确识别。
添加宏开关
在工程配置窗口中找到Preprocessor Definitions,添加下列项:
- NRF_DFU_SVCI_ENABLED
- NRF_DFU_TRANSPORT_BLE=1
- BL_SETTINGS_ACCESS_ONLY
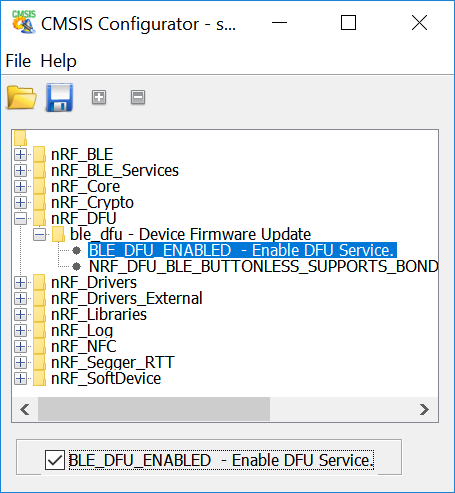
配置sdk_config
在sdk_config.h中,做如下更改:
- BLE_DFU_ENABLED = 1
- NRF_SDH_BLE_VS_UUID_COUNT += 1
添加头文件
在main.c中添加以下头文件:
- #include “nrf_dfu_ble_svci_bond_sharing.h”
- #include “nrf_svci_async_function.h”
- #include “nrf_svci_async_handler.h”
- #include “ble_dfu.h”
- #include “nrf_power.h”
- #include “nrf_bootloader_info.h”
添加代码
打开Buttonless示例工程的main.c,将下列函数复制到当前工程的main.c里:
static bool app_shutdown_handler(nrf_pwr_mgmt_evt_t event){};
NRF_PWR_MGMT_HANDLER_REGISTER(app_shutdown_handler, 0);
static void buttonless_dfu_sdh_state_observer(nrf_sdh_state_evt_t state, void * p_context){};
NRF_SDH_STATE_OBSERVER(m_buttonless_dfu_state_obs, 0) = {};
static void ble_dfu_evt_handler(ble_dfu_buttonless_evt_type_t event){};
添加Buttonless DFU服务
在main.c/services_init函数末尾添加DFU服务:
ble_dfu_buttonless_init_t dfus_init = {0};

// Initialize the async SVCI interface to bootloader.
err_code = ble_dfu_buttonless_async_svci_init();
APP_ERROR_CHECK(err_code);

dfus_init.evt_handler = ble_dfu_evt_handler;

err_code = ble_dfu_buttonless_init(&dfus_init);
APP_ERROR_CHECK(err_code);
调整内存地址
按照上面步骤依次走下来,已经可以通过编译。烧录Softdevice和Application,打开串口工具,应该看到日志消息提示内存地址和内存大小需要调整,如下:
<warning> nrf_sdh_ble: Insufficient RAM allocated for the SoftDevice.
<warning> nrf_sdh_ble: Change the RAM start location from 0x20002B90 to 0x20002B98.
<warning> nrf_sdh_ble: Maximum RAM size for application is 0xD468.
<error> nrf_sdh_ble: sd_ble_enable() returned NRF_ERROR_NO_MEM.
在工程配置窗口中找到Section Placement Macro,参照日志调整RAM的起始地址和Size。
重新编译和下载工程。
此时串口工具不再提示内存问题,但是仍然提示Fatal error。这是因为Buttonless DFU服务会检测芯片中的Bootloader,如果我们没有预先烧录Bootloader,就会出现这个错误。
至此,为ble_app_hrs工程添加Buttonless DFU服务,代码层面工作全部结束。
(3)Bootloader Settings
直接烧录softdevice、bootloader和application,会发现application并未运行,芯片一直跑在Bootloader中。
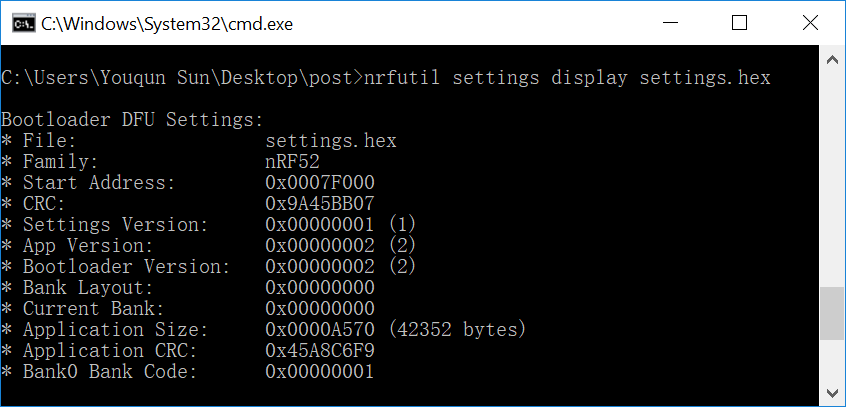
芯片启动后先进入Bootloader,检测Bootloader Settings中的数据,如果这些数据指示Flash中有一个有效的Application,则跳转进入Application。Bootloader Settings是Flash中的一段区域,它包含了Application的大小、CRC等数据,执行DFU时也会在这里存储状态信息。
正常执行DFU时,Bootloader自动生成和维护Bootloader Settings信息。而烧录过程不同,需要手动写入。可以根据application.hex生成一个bl_settings.hex,以产生这些数据,然后烧录这个hex。
生成bl_settings.hex的命令为:
nrfutil settings generate
    --family NRF52
    --application app.hex
    --application-version 2
    --bootloader-version 2
    --bl-settings-version 1
    bl_settings.hex
注意–bl-settings-version只能是1,不可以是其他值。从源代码上看它应该是个预留位,没有作用。
通过命令nrfutil settings display bl_settings.hex可以查看Bootloader Settings的内容:
(4)烧录
每次我们修改应用程序代码,都会导致现有的Bootloader Settings信息失效,需要重新生成并烧录bl_settings.hex。可以利用批处理来完成生成、烧录的动作。
第一次烧录程序时,需要烧录softdevice和bootloader:
@echo off

set app=<your app.hex path>

nrfutil settings generate --family NRF52 --application %app% --application-version 2 --bootloader-version 2 --bl-settings-version 1 bl_settings.hex

nrfjprog -e
nrfjprog --program softdevice.hex
nrfjprog --program bootloader.hex
nrfjprog --program bl_settings.hex
nrfjprog --program %app%
nrfjprog --reset

pause
后续再次烧录,可以省略烧录Softdevice和Bootloader的步骤:
@echo off

set app=<your app.hex path>

nrfutil settings generate --family NRF52 --application %app% --application-version 2 --bootloader-version 2 --bl-settings-version 1 bl_settings.hex

nrfjprog --program bl_settings.hex --sectorerase
nrfjprog --program %app% --sectorerase
nrfjprog --reset

pause
nrfjprog命令中使用了--sectorerase参数,以保证只擦除并填写指定区域。
(5)调试
调试时候会频繁的修改代码,如果每次都要重新生成和下载一遍bl_settings.hex,会疯掉。
我们可以在代码中禁止Bootloader检测Bootloader Settings,让它直接跳转进入Application。
打开Bootloader工程nrf_bootloader.c,在nrf_bootloader_init函数中做如下改动:
dfu_enter = dfu_enter_check();

==>

dfu_enter = dfu_enter_check();
dfu_enter = false;  // Force not entering DFU
芯片上电后,Bootloader虽然检测到Setting异常,但仍然进入Application,无需额外烧录bl_settings.hex。
(完)

我的跳转 bootloader 方法。
#define BOOTLOADER_DFU_GPREGRET_MASK (0xB0) /**< Magic pattern written to GPREGRET register to signal between main app and DFU. The 3 lower bits are assumed to be used for signalling purposes.*/
#define BOOTLOADER_DFU_START_BIT_MASK (0x01) /**< Bit mask to signal from main application to enter DFU mode using a buttonless service. */
#define BOOTLOADER_DFU_GPREGRET2_MASK (0xA8) /**< Magic pattern written to GPREGRET2 register to signal between main app and DFU. The 3 lower bits are assumed to be used for signalling purposes.*/
#define BOOTLOADER_DFU_SKIP_CRC_BIT_MASK (0x01) /**< Bit mask to signal from main application that CRC-check is not needed for image verification. */
#define BOOTLOADER_DFU_START (BOOTLOADER_DFU_GPREGRET_MASK | BOOTLOADER_DFU_START_BIT_MASK) /**< Magic number to signal that bootloader should enter DFU mode because of signal from Buttonless DFU in main app.*/
#define BOOTLOADER_DFU_SKIP_CRC (BOOTLOADER_DFU_GPREGRET2_MASK | BOOTLOADER_DFU_SKIP_CRC_BIT_MASK) /**NRFFW[0] != 0xFFFFFFFF)
{
NRF_LOG_INFO(“Setting vector table to bootloader: 0x%08x”, NRF_UICR->NRFFW[0]);
err_code = sd_softdevice_vector_table_base_set(NRF_UICR->NRFFW[0]);
if (err_code != NRF_SUCCESS)
{
NRF_LOG_ERROR(“Failed running sd_softdevice_vector_table_base_set”);
return err_code;
}
}
// Signal that DFU mode is to be enter to the power management module
nrf_pwr_mgmt_shutdown(NRF_PWR_MGMT_SHUTDOWN_GOTO_DFU);
return NRF_SUCCESS;
}
sdk15,5832,在HRS工程上用这个过程,的确有效^-^. 但是在做ble_app_uart增加dfu功能时却遭遇到失败。只用softdevice和带DFU的app。uuid已变为2。程序根本不启动,复位后当然就没有RAM应该移动到哪儿start,size最小要多大的提示信息输出。
大神,能否支个招呢/
打开调试,断点设到RAM地址信息输出那块,在调试窗口里看
直接修改地址0x20002B90就可以了
大神,我按照你的步骤还是编译出错。求指教。
出错行:
NRF_SDH_STATE_OBSERVER(m_buttonless_dfu_state_obs, 0)={};
错误提示:..\..\..\main.c(95): error: #29: expected an expression
这里不搞技术支持啊
文中源代码是哪里看到的?”–bl-settings-version只能是1,不可以是其他值。从源代码上看它“
你好,你看这么细致啊,我看到提交历史(https://github.com/NordicSemiconductor/pc-nrfutil/commits/master/nordicsemi/dfu/bl_dfu_sett.py)里面在这个文章发布后有几处关于setting version的提交,不知道是不是更新了。我有空看一下更新一下。
多谢你的提醒。
谢谢大佬,根据您的教程一步一步走到最后,成功把我的代码通过蓝牙烧了进去,
其中根据例程一直代码是会报错,原因是有些函数没有定义,也就是说要一直的不止博主说的那几行代码,具体可以查看报错信息,把没有定义的函数复制,然后在历程中查到到此函数并复制过来就可以了
感谢你的回复,可能SDK更新了,你这个反馈也会帮助到其他读者。